Showing posts with label brakes. Show all posts

Tuesday, May 8, 2012

How-To: Make 37 Degree AN Hard Lines

Story and Photos by Matthew Eddy


OEM brake tubing in the US have what is called a 45° double flare at the ends which means the end of the tubing is folded in on itself and flare at 45°.  A flare nut then crushes the tube end against the mating surface to make seal.  After the flare has been crushed it will require more torque to seal seal each time the system is disassembled and reassembled as well as the potential for fatigue cracks to form where the metal has been folded over.  This is fine for the commuter-consumer they aren’t going to be swapping out components from week to week or season to season.  Racers tend to tinker with their cars and may have to dismantle everything or replace components frequently so they need components that are designed to be disassembled and reassembled multiple times.  The 37° AN flare is a single flare is backed up by a tube sleeve that is held to the mating part with a nut and is capable of being disassembled multiple times without fatiguing and since it’s a single flare its actually easier to make than a double flare.  Additionally this method is rated at higher pressures and is held to a higher standard so the system is more robust and can endure the extremes of racing.  It is fairly common for a race team to immediately replace all stock brake lines with the 37° AN flared tubing as part of prepping the car for racing.
The down side of the AN flare is that the components are much more expensive and they also require an adapter to connect them to the stock brake components such as the master cylinder, proportioning valves and ABS block.  Also the tools tend to be more expensive but you can find a 37° flare tool on Summitracing.com for about $30 HERE.   If you decide to upgrade your brakes to the AN fittings then you can save yourself some money and time by only replacing the lines that run from the ABS block  (or the proportioning valves for those cars without ABS) to the calipers and leave any plumbing that might be going from the master cylinder to portioning valves or ABS block. The AN fittings can also be used for routing fuel, vacuum lines, and various other fluids.  Make sure to use STEEL fittings on the brakes or any other high pressure hydraulic systems and you can use aluminum fittings for anything else.

It is pretty easy to convert to AN flared lines but there are a few more parts you need to buy.  I would suggest getting stainless tubing and an appropriate tubing cutter because the $5 Acme Autoparts special will just cry when you try and cut a stainless line with them; they are barely adequate to cut a regular steel line.  Try this one from Mcmaster-Carr: part number 2764A14.  I haven't use this particular one but it does say its for stainless and titanium.

Step 1:  Cut the stainless tubing to length and deburr the ends.  PUT THE HARDWARE ON THE TUBE!  Easy to forget this step you get so excited about flaring the brake line and forget to put the hardware on.  So put on a TUBE NUT, then a TUBE SLEEVE.  Make sure they are facing the right direction.  See pictures at bottom. 

3/16" Stainless Brake Line Cut and Deburred.


Step 2: Clamp the tube into the flaring tool.  It should be sticking a little above the surface of the tool.  The one pictured below is from Summit Racing.  You can find it HERE.

Summit Racing 37 Degree Flaring Tool


Make sure you clamp this down TIGHT.  If its not tight enough the tube will just slide out.  I used a wrench as shown below to get it extra tight.


Use a Wrench to Tighten Flaring Tool.

Step 3: Flare it!


Summit Racing 37 Degree Flaring Tool in Action.

Successful 37 Degree Flare
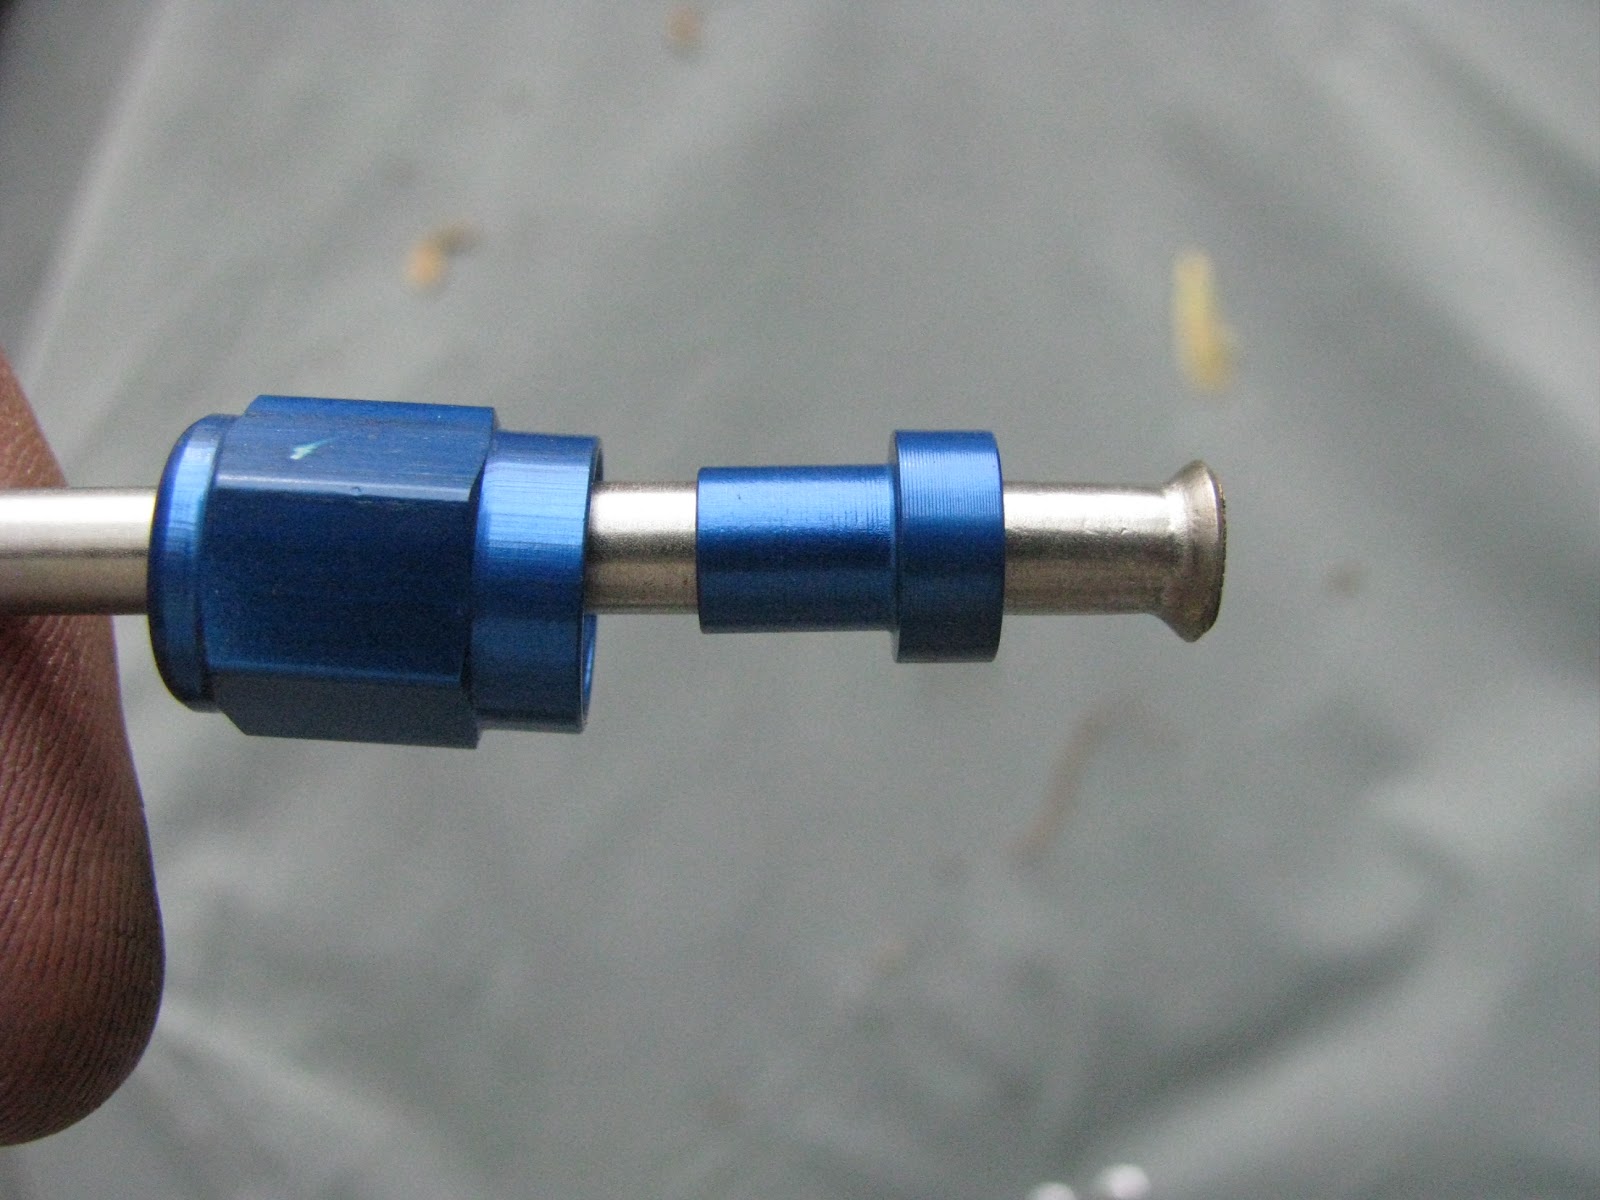
Here is a picture with all the hardware on behind the flare.  These are aluminum fittings, so this isn't to be used for brakes.  The steel ones usually are plain zinc. Left to right are the tubing nut with the threads on the right side followed by the tube sleeve.  The sleeve will be beveled on the side that will sit behind the flare. 


37 Degree -3AN Fittings on Stainless 3/16" Tubing.

37 Degree -3AN Fittings on Stainless 3/16" Tubing.

37 Degree -3AN Fittings on Stainless 3/16" Tubing


The adapters you will need to connect these to the master cylinder for instance look like this.  Most domestic car makers use 3/8-24 (I think) so need this adapter HERE.  Japanese tend to use M10x1.0 so you use this adapter HERE.  These adapters simply screw into the MC or proportioning valve then the new AN fittings screw to these.

Saturday, November 12, 2011

Myth of Big Brake Upgrades

Lemans Car at Sebring - the red glow within the wheels are the rotors heating up in a braking zone just before a turn. Photo by Jeffery Ling


It is easy to believe that larger rotors and bigger calipers will make your car stop faster, but that is because most people assume that brakes stop the car, when in actuality they only stop the wheels.  This may seem like a minor distinction, but consider this: if you slam on the brakes and lock up the wheels (assume the car doesn’t have ABS for simplicity), does the car stop?  Not when traveling at speed it doesn't.  The car slides for a while with smoke billowing  and the tires screaming in agony.  At this point, stopping distance is determined not by the size of the rotor, or if they are cross-drilled, or Carbotech brake pads, but by the tires.  A quick side note: locking up the tires is never considered to be the fastest way to stop a car, but even still, it’s the tires that will have the biggest impact on the stopping distance of a car.

So, if the brake system only stops the wheels from turning, but doesn’t stop the car, then why use fancy drilled and slotted rotors, the $150+ race pads, and multi-piston calipers?  The answer is a bit more complicated and will require a short and hopefully painless foray into the world of physics.  The brake system of a car is an energy conversion system. It takes the energy of the car’s momentum and converts it to heat.  When you apply the brakes you slow down because your forward momentum is being converted into heat energy by the friction of the pads on the rotors.  If you slam on the brakes once, the car will slow down very quickly and your brake system will become very hot. If You then accelerate and do it again within a short time interval the brakes get hotter.  And if  you keep doing this, eventually you will put so much heat into the system that they don't work effectively any more, and the brakes will feel softer and softer until they don’t work any more.  This is called brake fade.  For those who have lived or driven in the mountains are already familiar with brake fade when descending a mountain.  If you haven’t had the chance to drive in the mountains then let me explain.  When heading down hill for an extended period of time you are constantly checking your speed with some braking inputs to keep you from accelerating.  If you don’t down shift and take some of the load off the brake system your brakes get so hot that they don’t work any more, and then your trip down the mountain becomes rather terrifying.  It is when you are stressing the brake system with repeated accelerating and hard braking like you would on a road track that a big brake system makes sense. 

Here is a list of common brake upgrades and what purpose they serve.  You will notice almost all of them deal with managing heat or increasing the heat tolerance of the system.

DOT 4 or 5 brake fluid – Most cars come with DOT3 brake fluid, which is perfectly fine for every day driving, but DOT 4 has a higher boiling point so the fluid can withstand higher temperatures so the brakes can get hotter before they start to fade.  I would highly recommend using at least DOT 4 in any track car.  DOT 5 is silicone based and has an even higher boiling point, but the brake lines need to be thoroughly flushed when converting a DOT 3/4 system to DOT 5 since the different fluids do not play well together.

Stainless Steel Brake lines – Brake lines in the car tend to be all hard lines except for a short flexible rubber section from the chassis to the caliper to allow for suspension travel.  When the brakes fluid heats up from heavy use, the rubber gets a little softer and allows the line to expand a little, which translates into a slightly softer pedal feel.  The stainless steel lines don’t allow the line to expand and so the brakes feel a bit stiffer and more consistent.  Also, the stainless steel is much more durable.

Racing Compound Brake Pads – If you go to your local auto parts store for pads they cater to the common driver who aren’t racing their car and don’t want noisy brakes.  The primary difference between a race formulated pad and an AutoZone pad is that the compound works at higher temperatures.  Because of this, many of the really aggressive race pads will need to come to temperature before becoming 100% effective.  You will also notice a big difference in feel.  The brakes should feel sharper, will be more consistent.  They also tend to be noisier, and its very important that they are bedded in before taking them out on the track.  There may be additional benefits to give up an arm or a leg for the more expensive pads depending on application.  My 24 Hours of Lemons team runs a ‘96 Neon, and at our first race we ran Hawk Blacks.  After approximately 8 hours of racing the pads were worn out, and the backing plate bent backwards cracking the caliper piston.  We had to swap not only pads but scrounge for another caliper, which we ended up taking off another team’s car that had retired with a blown engine. I am not blaming the Hawks, they are good pads, and we believe that a major cause for the failure was lack of airflow to the front brakes.  However, we installed brake ducts and now run Carbotechs that cost over $200 just for the fronts, because they have a good track record for surviving an endurance race, and they have an extra thick backer plate to prevent the pads from bending backwards, because this is a common problem with Neons.

Slotted Rotors – A slotted rotor has grooves machined into the face of the rotor that helps give the pad a bit more traction and vents gases that are produced as the pad heats up. This will wear the pads faster but should have a sharp, and more importantly, a consistent feel.

Cross-Drilled Rotors – As I had mentioned, a lot of hard braking in a short period of time will cause heat to build up in the brakes, and if they get hot enough the braking power becomes less and less, until it eventually fails all together.  These rotors will have holes drilled into them that will help the rotors cool down faster so that the brakes don’t fade.  There are also the combination rotors that have been both drilled and slotted so that they have benefits of both.  Please do not go cheap on these parts, since a cheaply made cross drilled rotor can crack prematurely and potentially fail at a very inconvenient time.

Larger Rotors –Having a larger rotor means there is more rotor material and they can absorb much more heat energy.  Also they have more surface area so they will cool faster.

Multi-piston Calipers – Many of you may not even know what a caliper piston is so I will try and briefly explain.  The caliper is a hydraulic system that squeezes the pads against the rotors.  To do this there is a cylinder that one of the pads sits against, and when the brake pedal is pressed, the piston presses it against the rotor.  An arm on the caliper assembly that moves with the pressure of the piston reaches over the rotor and applies braking pressure to the other pad on the opposite side of the rotor.  In general, this one piston system works fine because it is more than sufficient for street driving.  However, on the track the system is being taxed heavily, and as the brakes heat up the pads will flex slightly.  The single piston in the middle of the pad will focus the brake pressure on the center of the pad and the edges will flex away from the rotor.  This means the pad is not being heated evenly and so the whole pad is not sharing in the braking load.  Arranging multiple pistons behind the pad means the braking force is more evenly applied for increased braking efficiency.  There are dual piston, 4 piston, and 6 piston calipers that I am aware of.  Since more of the load is being shared along the whole length of the pad, they don't wear as fast and can actually save you money as well as improve safety.

Brake Ducts – These are a very simple modification that can really improve the effectiveness, and life, of your brakes when on the track.  There are special brake ducting hose that looks like plastic dryer ducting, or you can be really cheap and just get aluminum dryer ducting.  The idea is to route some air from the front of the car to the rotors so that they stay cooler.

When I was running my MR2 track car, I had run the stock brakes with stock pads and had no issues with brake fade, and I definitely can lock up the wheels, so the only modification I made was to run DOT4 brake fluid.  But the car only has a 135 horse power, so its no rocket ship, and therefore I wasn’t putting a lot of heat into the brakes.  I have just recently swapped in a V6 which has increased my WHP from 100 (in actuality, the motor was pretty tired, so I bet I was closer to 85 or 90) to about 165.  Though I haven’t run the car yet, I am anticipating that I will have issues with the stock brakes overheating.  The plan is to upsize the brakes to what the turbo model has and add stainless steel brake lines.  Since the turbo has approximately 200hp, and my V6 version has about the same, the cars braking requirements should be about equal and so this upgrade should be sufficient.

How to Upgrade Smartly
Racing, or even tracking, a car is an expensive hobby, so you may be wondering how to get the most bang for your buck when upgrading your brakes.  One easy rule of thumb is that if you have modified your car, giving it significantly more horsepower, then it is a good bet that you will also need to upgrade the brakes before you take to the track, since the stock system probably won't be able to handle the extra heat.  Another indication that you will need to make some modifications to your brake system would be if you are experiencing brake fade while on the track, even if it is a stock car running stock brakes. 
First, always upgrade your brake fluid to at least DOT 4.  In order for this to be effective you need to bleed brake lines dry but you won't have to flush them.  While you are at it, I would suggest getting the stainless steel brake lines for the extra durability and better pedal feel.

If you are only experiencing slight fading when on the track a pretty simple and relatively cheap modification would be to add brake ducts.  Sometimes all you need is a bit more air flow to keep the brakes cool and they will be fine.  

If you have done both of these and are still experiencing brake fade it's time to look at new rotors and pads.  There are mildly aggressive race pads that will handle heat better than regular stock pads.  Cross-drilled rotors shed heat a lot faster than the plain-Jane rotors that come with most cars, so the combination of the two should give you a significant improvement.  
Finally, if none of this is working you have a pretty serious car or a mechanical issue.  Serious cars means big brakes, which means new rotors, calipers, and pads.  This is a pretty involved upgrade, since this can also effect your brake balance, which is a whole other discussion.  

Of course, if you are ever having braking issues on the track, slow down to a safe speed and pit.  Also, when in doubt, either about making any modifications to your car or the safety of the car you should always make the safe decision.