Suspension Tuning, tips, and more
by: Matthew Eddy, 2018-07-31
You have a car and you plan to race it or track it and you
want to make some adjustments to the suspension so you can go faster. What can
you do? Well first, let us define what I mean by the suspension so everyone has
a clear working terminology for this article. “Suspension” for this article
refers to all springs, shocks, control arms, suspension links, sway bars,
tie-rods, strut mounts, wheels, and tires. It’s a lot of stuff you can
tweak for good or bad. Some adjustments may be good for one track or condition
and bad for others. Also, a change that you do now that makes you faster may be
bad as you become a better driver or when you actually start collecting data
such as lap times.
Part one will deal with essentially stock suspension
adjustments and then part two will go over common modifications. It is important
to keep in mind that the tuning mentioned in Part 1 is still relevant to any modifications
that you may eventually or have already made.
Part
1 - Stock Suspension:
If you just got the car great – DON’T DO ANYTHING DRASTIC!
Assuming the car is already a sporty car of some sort, the manufacturer already had a bunch of engineers drive the car around the road and track for
thousands of hours tweaking the suspension so you have a pretty good base to
start from. Also, if you are reading this you are new to suspension setup and
tuning and probably new to the track. The last thing you want to do is make a
bunch of changes to the car before you even know how to drive.
Now as you get more familiar with the car and you start
getting a feel for it you should start making some changes.
#1 - Tire Pressure
If you are new to motorsports this may seem pretty minor but
you would be surprised how drastic of a change the tire pressure can have not
only on the feel of the car but your finished lap times. Ideally you will make
changes based on quantitative analysis of some kind of data –
like lap times. But even without that data you can adjust pressures to tune the
feel of the car.
First, it should be clear that tires are not rigid and their
shape will change depending on the weight of the vehicle, the shape of the rim,
and their pressure. That’s why vehicle manufacturers tell you what pressure the
tires should be set at and not the tire manufacturer. As a driver, you want to
optimize this shape by adjusting the pressure so the tire sits as flat as
possible against the ground. Over inflate the tire and the center of the tire bulges
out and you reduce traction. Under inflated tires the center sucks in, you ride
on the shoulders, and not only reduces traction but it feels less planted. So
ignoring the manufacturers recommendations the ideal way to determine the
correct pressure is to use a tire pyrometer and measure the temperature across
the width of the tire (outside shoulder, center, and inside shoulder) on all 4
tires and it should be relatively even. If you don’t have a pyrometer – which
is fine because they are kind of expensive – you start by lowering the pressure
slightly and see how it feels. You can mark the side walls of the tires with a
paint marker or chalk to see if its starting to roll over. Work your way down
slowly until it feels like they are too soft or you start rolling the tires.
#2 - Alignment
Some alignment changes will help improve the feel of the
car. Often car manufactures set the alignment to optimize tire wear which
doesn’t necessarily optimize handling. This is something you could do yourself
at the track but it takes some patience and a little practice.
Quick
rundown of terminology:
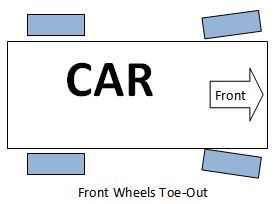
Toe - if looking at the car from
above, toe is how parallel each set of wheels are to each other. Toe-in means
the (again when viewed from above) the tires are pointing toward each other. Toe out is
the opposite. See images below for examples.

Camber – If viewing the wheel from
front or rear of the car, this is a measure of how perpendicular the wheel sits
to the ground. Negative camber means the tire leans in toward the car. Extreme
negative camber is called, I believe “stance” which is something that has
become popular with all the kids these days.

Caster – Not really mentioned but
because it’s part of the alignment it is only on the steering wheels and is a
measure of the steering angle. Sometimes this is adjusted for racing
applications but I am not going to touch on that in this article.
People have probably already figured out the best alignment
for your particular car so try and find that information but here are some
general suggestions:
- Toe out the front tires. This can make the car feel more agile in regards to steering. This is only like 1-2° of toe
- For RWD cars that are prone to oversteer, you can help tame that a little by adjusting the rear toe in 1-3°
- For FWD cars (or any car but more typically FWD) that suffer from understeer toe-out the rear to try and make the back end a little looser.
- Negative camber is good. For any stock vehicle you can adjust as much negative camber as you can get front and back. This will help with cornering. People will often get camber plates to add even more negative camber. There is a point at which you can add to much camber because the car is riding on the inside shoulder too much and you will lose braking distance

Part
2 - Suspension Modifications:
I will preface this section and say that likely any changes
you make (new sway bars, springs, struts, coilovers etc) are likely to improve
the handling of your vehicle. While that may be the case, the changes may not
optimize performance or may have some other negative effects even if there is
an improvement overall. Any of the changes below are starting to get into the
range of moderate to advanced suspension tuning and if you are truly looking to
optimize handling of your vehicle that you use this a stepping off point to do
more research on suspension setups specific to your vehicle. It is also good to
have a pretty good feel for the car in its stock configuration so you can make
an educated evaluation of the changes you have made, be familiar with the terminology,
collect data – lap times, tire temperatures, suspension travel, etc.
#1 - Wheel and Tires:
One improvement you can make that is pretty straight forward
is to go with wider tires. More tire = more rubber on the track = more traction
= more speed in the corners. That’s a pretty simple formula. Just like there is
no free lunch, there are some trade-offs that people should be aware of and
some “tuning” that can be accomplished with this. You can choose to have the
same size tire on all four corners of the vehicle this is called a square
setup. Versus having larger tires on the drive wheels which is called a staggered
setup. I suppose you may choose to put larger tires on the non-driving tires
but I never heard of it but that doesn’t mean there isn’t good reason to do so
for certain applications. The most typical of the staggered wheel setups is on
RWD cars and they have wider tires in the back but I have also seen FWD cars
with big honkin tires up front. This makes sense for FWD cars since the rear wheels
are only there to keep the back end from dragging on the ground. By changing
tire sizes you can increase grip but also compensate for under or oversteer to
some degree. If your car currently has a square setup, and you get a lot of
oversteer, then consider leaving the front tires the same size and increasing
the rear tires. Or increase the size of all the tires but increase the rears
more than the front. If you experience a lot of understeer, adding more tires
to the front of the car may or may not help. This is something you will have to
try experiment with since understeer can be caused by a few factors including
bad driving line. There are some downsides to going big. One is that your top
speed will drop. More tires means more traction. Another word for traction is
friction. Even going in a straight line the tires are going to increase
traction. This may sound bad but in general the car will make up for this loss
of speed in a straight line by higher speeds in the corners. Second is that
wider rims are heavier. Weight, and especially unsprung weight is not good but
again the downsides are relatively minor compared to the improved handling. So
this is a balancing act. How much tire is to much? That is something you will
have to determine yourself with trial and error and don’t forget - data.
*** A
word of warning – changing wheel and tire sizes can lead to fitment issues. You
might start to getting rubbing on the strut, the wheel well, etc. This may only
occur while turning or hard turn. A good resource are forums or FB groups and
ask what tire sizes people go with. You may have to get wheel spacers or roll
your fenders.
#2 - Sway Bars (aka anti-roll bars):
The purpose of the sway bars are to reduce body roll in a
turn. How sway bars help increase traction is a bit involved for this article
but in short by reducing body roll, more weight is kept on the inside tires
during a turn. What is important from a suspension tuning perspective is that
adding a sway bar can have a huge effect on the feel and performance of the
car. You can also add or reduce oversteer and understeer by changing the
relative stiffness between the front and rear sway bars. Now it’s very
important that you understand that the below guidelines are RELATIVE stiffness
between the front sway bar and rear sway bar.
- Stiffer front sway bar increases understeer
- Stiffer rear sway bar increases oversteer
I will mention this a third time, the difference is
relative. For instance, you can increase the relative stiffness of the front by
reducing the stiffness in the rear and vice versa. Why this is important is
that you may want to change the balance of the car (reduce understeer or
oversteer) and adding a stiffer sway bar may not be an option because there
just isn’t one available or you have maxed out the ability of your suspension
to handle a larger sway bar. So instead you can reduce the stiffness of the
other one to have the same effect. It’s a good idea, when possible, to get an
adjustable sway bar so you can tune the car a little bit while you are at the
track.
Here is an example. I have 91 MR2 and the car is known for
its snap oversteer. A few years ago I installed a V6 in it and I wasn’t sure
how it would handle on the track. So for my first outing at the track I decided
to disconnect the rear sway bar to increase understeer and reduce oversteer.
Once I was out there it didn’t feel necessary and unfortunately I didn’t get a
chance to try it with the rear sway bar connected back up because I spun a rod
bearing on the very first session. The important part of this example is
that I was able to change the relative stiffness of the front sway bar by
reducing the stiffness of the rear which I did by disconnecting it altogether. I
was sad. Anyways, some real life application for you.
To tickle your brain a little – some people don’t like sway
bars and would rather eliminate them. This gets into deep suspension theory,
and this is a very small minority, but some people would prefer to just
increase the spring stiffness substantially. The reason being is that sway bars
link the pair of wheels together which is a lot like having a solid axle which
is bad. The stiffer the sway bar, the less the wheels can act independently. My
suggestion would be to still use a sway bar and educate yourself a bit more
before doing anything drastic.
#3 - Lowering Springs & Adjustable Shocks:
Luckily there are a lot of options for lowering springs and
adjustable shocks so will likely be a benefit if you go with a reputable brand.
Lowering springs usually do two things, first is to lower the vehicle which
lowers your center of gravity making the car feel more planted, and second is
the springs are usually stiffer. If you go this route I suggest getting either
adjustable shocks or shocks that were intended to be used with the lowering
springs. I say this because the purpose of the shock is the dampen the tendency
of the spring to want to oscillate (or bounce). If the shock is not strong
enough the spring will over power the shock. If the shock is to strong it does
not allow the car to settle in a reasonable amount of time. Meaning the
suspension is still going back to equilibrium as soon as it can. Ideally you
have a shock that is perfectly tuned to the spring. A stock shock is likely
going to be to weak to dampen a stiffer spring so I would not suggest replacing
only the springs. REpalcing just the shocks without replacing the spring is
only going to give a small improvement to overall handling.
Like the sway bars mentioned above, you can adjust the
understeer/oversteer balance of the car by changing the relative
stiffness of the front springs versus the rear springs of the car.
- Stiffer front springs increase understeer
- Stiffer rear springs increase oversteer
One downside of lowering springs is that they usually don’t
have a range of stiffness available so there is very little customization to
change the understeer/oversteer balance of the car so you can compensate this
by changing sway bars, wheels and tires and even the tire pressure. Another
downside is the shocks are usually the same length and with the car sitting
lower the shocks are compressed a bit more than usual. This means there is less
travel available before hitting the bump stops.
#4 - Coilovers –
A coil-over comes from the term coil over shock which
I think it’s funny because strut is a coil over right? I believe this
terminology developed before struts were invented and most vehicles had springs
and shocks separate from each other. The main difference between a strut and a
coil-over is that you can adjust ride height with the coilover. Another difference/advantage with coilovers
is the spring diameter is pretty standard so you can easily change out the
spring for a different length and/or stiffness (aka spring rate). A lot
actually goes into a good coil-over system and you get what you pay for because
what you are relying on is that the manufacturer had done a good job tuning the
whole system for your particular vehicle. There is a lot to tune in a system
like this such as choosing the proper spring rate, the socks are paired well
with springs, and this includes different springs/shocks for the front and the
rear. If the shocks are adjustable, a good shock will have a very smooth
consistent adjustment curve. So I am saying cheap coilover kits are not going
to be as good as expensive ones but it may not matter because regardless you
will likely see an improvement in handling.
One
benefit of being able to adjust the height of the car on each “corner” of the
vehicle, is that this also changes the weight balance of the car. If you
haven’t heard of 4 corner scales you will want to. They look like 4 bathroom
scales hooked together and it tells you how the wright of the car is
distributed across all 4 wheels. So if you get coilovers and you don’t do this
– even a little bit – then you are missing out on one of the whole reasons to
get them. If your plan was to just lower the car X inches and forget about it
then you can buy lowering springs for that.
My suggestion is not to get coil overs until you have some
track time under your belt. You have done a good deal of research about
suspension setups in general and for your car specifically and are prepared to
get the full benefit from the system.
#5 - Suspension
Geometries
All the above is well and good but another step that is
intermixed with the modification listed above is to actually start changing
suspension geometries by lengthening/shortening arms, moving and/or modifying
their locations, and changing mounts. There is too much variation between
vehicles to get into specific changes so I will list some of the more common.
-
Camber/Caster Plates – Typically this is
for camber but some plates also allow you to adjust caster. The will replace
the top strut mount which will allow you to get more camber adjustment. Stance
is life.
-
Control
Arms – This one may be harder to explain but on many cars when you lower
the vehicle you are actually changing the angle of the control arms. Imagine
how a control arm moves. In the most simple example it’s a arm that attaches to
the car and pivots. The other end attaches to the wheel. When that arm moves up
and now, if you were to trace the motion of the end of the arm it makes an arc.
Now imagine a wheel is attached to that arc and as the arm swings up and down
the angle of the wheel in relation to the ground is going to change. That means
the camber is going to change. The camber changing while the suspension moves
means you are changing the feel of the car as the suspension travels. Some cars
people make camber adjustable control arms or longer control arms so that the
camber always stays negative.
#6 - Aerodynamics
I am not going to get into to much detail here but there are
a few comments on aerodynamics and how that works with suspension.
The three main aero mods are
1 Rear Wing
– This helps to push on the back of the car and keep the back end planted
in a turn. The down side is that it creates a lot of drag and will slow you
down in a straight line.
2. Front
Splitter/Air Dam – Kind of the same but slightly different I’ll explain the
difference briefly. The air dam projects vertically down from the front bumper
and all it does is prevent air from getting under the car. By preventing this
it helps push the car down. The front splitter essentially does the same thing
but better because it also adds a lip that projects out in front of the car and
will actually help to push the front end down similar to how a rear wing works.
This also increases the drag on the car so will reduce top speed.
3. Rear Diffuser – A rear diffuser is this
magical aerodynamics thing that gives you free downforce without any drag loss.
The only issue is that it’s very difficult to make is effective. The car needs
to have a perfectly flat bottom, and then it has to curl up the back of the car
a bit with some vanes to help keep the airflow going in the proper direction. A
lot of cars have fake rear diffusers because they look racy but getting one to
function properly is tricky.
Aerodynamics makes the car grip harder by physically pushing
the car into the ground. By pushing the car down means the tires are being
pressed into the road even harder which means they have more traction. A
formula 1 car’s aero can produce three times its own weight in downforce.
A couple things make aerodynamics tricky. One is that the aero
mods are literally pushing the car down and compresses the suspension a bit
which makes the car lower. If you have adjustable height suspension such as
coilovers, you will need to alter your ride height to account for this
additional force which can be even trickier since a rear wing and a front
splitter will likely be applying different forces at the same speeds. Second is
that different tracks are going to have different mix of straights, fast
corners and slow corners and the car is going to perform very differently in
each and will require a fair amount of tweaking to optimize your setup.
The main points I want to make with aerodynamics that it
adds a lot more variables to an already tricky equation. Ideally you will be
getting real data on how much downforce is being generated at various speeds
and use that to help make educated decisions on the proper settings.
I should also stress that a lot of people, especially if
they are just doing track days for fun, don’t do any of this stuff. They buy
it, bolt it on, and it will usually improve performance. They set it and forget
it and then have fun. However, if you are competing then it would benefit you
to consider all these effects to learn how to optimize your setup for each
track, weather, and temperature.
Conclusion
The main purpose of this article is to give you some pointers
for some simple suspension tuning and also a background in suspension
modification and tuning in general. The thought is you take this foundation of knowledge
and build on it for your own particular vehicle and goals. Look for future
articles that go into more detail. If
you have questions or article ideas please feel free to leave them in the
comments section below. I will try and get to them when I can.
Thank you.


